Ingesting L2 order book data with multidimensional arrays
If you’ve ever worked with cryptocurrency or financial market tick data, you know that Level 2 (L2) data is critical for understanding market depth. Unlike Level 1 data, which only shows the best bid and ask prices, L2 data reveals more information about market liquidity and order flow with aggregated bid and ask volumes across multiple price levels. This data is crucial for traders, market makers, and quantitative analysts to make informed decisions based on supply and demand dynamics.
But ingesting, storing, and querying L2 data has historically been no easy feat.
Efficiently representing multiple (price, size) pairs for bids and asks
within a traditional database schema has been challenging, especially when using
a relational database that isn't optimized for array or nested data.
Typically, to store something like an order book with many price-size pairs, you’d have to:
- Create multiple rows per timestamp, one for each price level, leading to data explosion and slow queries.
- Use JSON or other nested types (if supported), which often don’t perform well for analytical workloads.
- Lose the compactness and speed benefits of storing all price and size data in a contiguous structure.
This schema design complexity and performance bottleneck make L2 data management cumbersome.
Recently, QuestDB (9.0.0+) added support for float64 arrays, which makes ingesting and querying L2 data much more efficient. Let's give it a spin. We'll modify the existing Cryptofeed tutorial to instead store L2 data as arrays.
Prerequisites
QuestDB supports the ARRAY type from versions 9.0.0 onwards. You can find the
latest release from the download page.
We will use the Docker container for our tests.
First, pull the latest QuestDB image and run it:
docker run -p 9000:9000 -d questdb/questdb:latest
Next, let’s set up our Python environment and install a version of the QuestDB
Python client library with ARRAY support (3.0.0+).
We'll use uv here, but feel free to use venv or other package management
tools.
uv venv --python=python3.12source .venv/bin/activateuv pip install cryptofeed numpy pandas asynciouv pip install -U "questdb[dataframe]"
A quick integration test
Before ingesting real data (which can be big), let’s verify that we can get ingestion working with hardcoded data.
Create a test.py file and paste the following code:
import pandas as pdimport numpy as npfrom questdb.ingress import Senderdf = pd.DataFrame({'symbol': pd.Categorical(['ETH-USD', 'BTC-USD']),'side': pd.Categorical(['sell', 'sell']),'price': [2615.54, 39269.98],'amount': [0.00044, 0.001],# NumPy float64 arrays are supported from v3.0.0rc1 onwards.'ord_book_bids': [np.array([2615.54, 2618.63]),np.array([39269.98, 39270.00])],'timestamp': pd.to_datetime(['2021-01-01', '2021-01-02'])})conf = f'http::addr=localhost:9000;'with Sender.from_conf(conf) as sender:sender.dataframe(df, table_name='trades', at='timestamp')
This code creates some artificial data and sends it to the database, as a quick integration test.
Now run python test.py and navigate to localhost:9000. Here you will find
QuestDB's web console.
A quick select should reveal the artificial data that we sent:
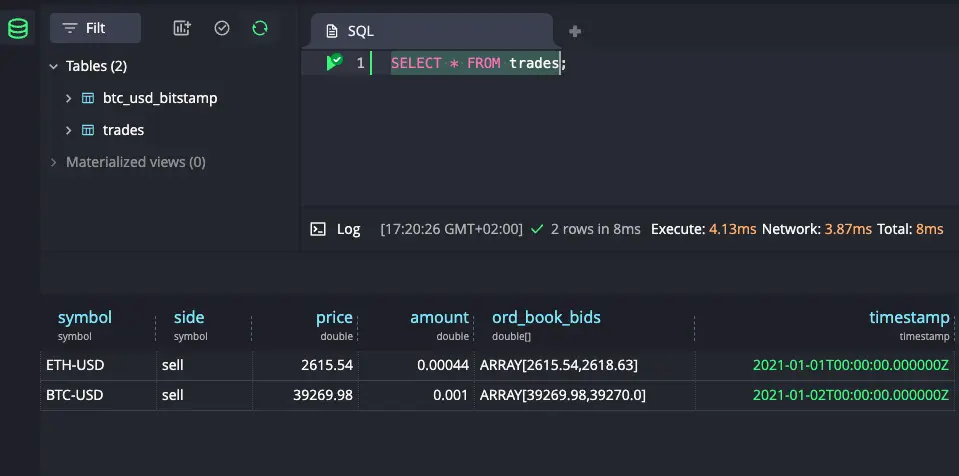
Look good? Onwards!
Ingesting real data
Next, let’s connect to a real exchange and start ingesting data.
We'll apply Bitstamp to grab L2 data (which has a public unauthenticated
endpoint). You can use Binance or Coinbase instead, if you have an API key.
To start, create ingest.py with the following code:
#!/usr/bin/env python3import asyncioimport numpy as npimport pandas as pdfrom cryptofeed import FeedHandlerfrom cryptofeed.defines import L2_BOOKfrom cryptofeed.exchanges import Bitstampfrom cryptofeed.types import OrderBookfrom questdb.ingress import SenderCONF = 'http::addr=localhost:9000;'# Shared in-memory buffer and lock_buffer: list[dict] = []_lock = asyncio.Lock()_flusher_started = Falseasync def flush_buffer():while True:await asyncio.sleep(5.0)async with _lock:if not _buffer:continuedf = pd.DataFrame(_buffer)with Sender.from_conf(CONF) as sender:sender.dataframe(df,table_name='btc_usd_bitstamp',at='timestamp')_buffer.clear()async def handle_book(ob: OrderBook, receipt_ts: float):global _flusher_startedif not _flusher_started:_flusher_started = Trueasyncio.get_running_loop().create_task(flush_buffer())# separate price and size arraysbids_dict = getattr(ob, 'bids', getattr(ob.book, 'bids', {}))asks_dict = getattr(ob, 'asks', getattr(ob.book, 'asks', {}))# build separate price and size arraysbid_prices = np.array([float(p) for p in bids_dict], dtype=np.float64)bid_sizes = np.array([float(bids_dict[p]) for p in bids_dict], dtype=np.float64)ask_prices = np.array([float(p) for p in asks_dict], dtype=np.float64)ask_sizes = np.array([float(asks_dict[p]) for p in asks_dict], dtype=np.float64)async with _lock:_buffer.append({'symbol': ob.symbol,'bid_prices': bid_prices,'bid_sizes': bid_sizes,'ask_prices': ask_prices,'ask_sizes': ask_sizes,'timestamp': pd.to_datetime(int(receipt_ts * 1e9), unit='ns'),})def main():fh = FeedHandler()fh.add_feed(Bitstamp(symbols=['BTC-USD'],channels=[L2_BOOK],callbacks={L2_BOOK: handle_book}))fh.run()if __name__ == '__main__':main()
Let’s break down this code and explore how it works.
main()
def main():fh = FeedHandler()fh.add_feed(Bitstamp(symbols=['BTC-USD'],channels=[L2_BOOK],callbacks={L2_BOOK: handle_book}))fh.run()
The main() function is straightforward. We’re instantiating a cryptofeed
handler, connecting to Bitstamp, and calling L2_BOOK data with our custom
handler.
handle_book
# separate price and size arraysbids_dict = getattr(ob, 'bids', getattr(ob.book, 'bids', {}))asks_dict = getattr(ob, 'asks', getattr(ob.book, 'asks', {}))# build separate price and size arraysbid_prices = np.array([float(p) for p in bids_dict], dtype=np.float64)bid_sizes = np.array([float(bids_dict[p]) for p in bids_dict], dtype=np.float64)ask_prices = np.array([float(p) for p in asks_dict], dtype=np.float64)ask_sizes = np.array([float(asks_dict[p]) for p in asks_dict], dtype=np.float64)
In the handle_book function, we’re decomposing the format Bitstamp L2 data is
sent in, and turning it into a format that QuestDB client library currently
supports.
If we look at Cryptofeed Bitstamp L2 code, we see that data is sent as (price, size) per side (bid, ask).
Instead, we separate the pairs into price and size arrays per side, and
coerce it to the np.float64 type.
flush_buffer
async def flush_buffer():while True:await asyncio.sleep(5.0)async with _lock:if not _buffer:continuedf = pd.DataFrame(_buffer)with Sender.from_conf(CONF) as sender:sender.dataframe(df,table_name='btc_usd_bitstamp',at='timestamp')_buffer.clear()
In the flush_buffer function, we flush our data to QuestDB every 5 seconds
(configurable), and send the dataframe to the btc_usd_bitstamp table.
Now let's try it out!
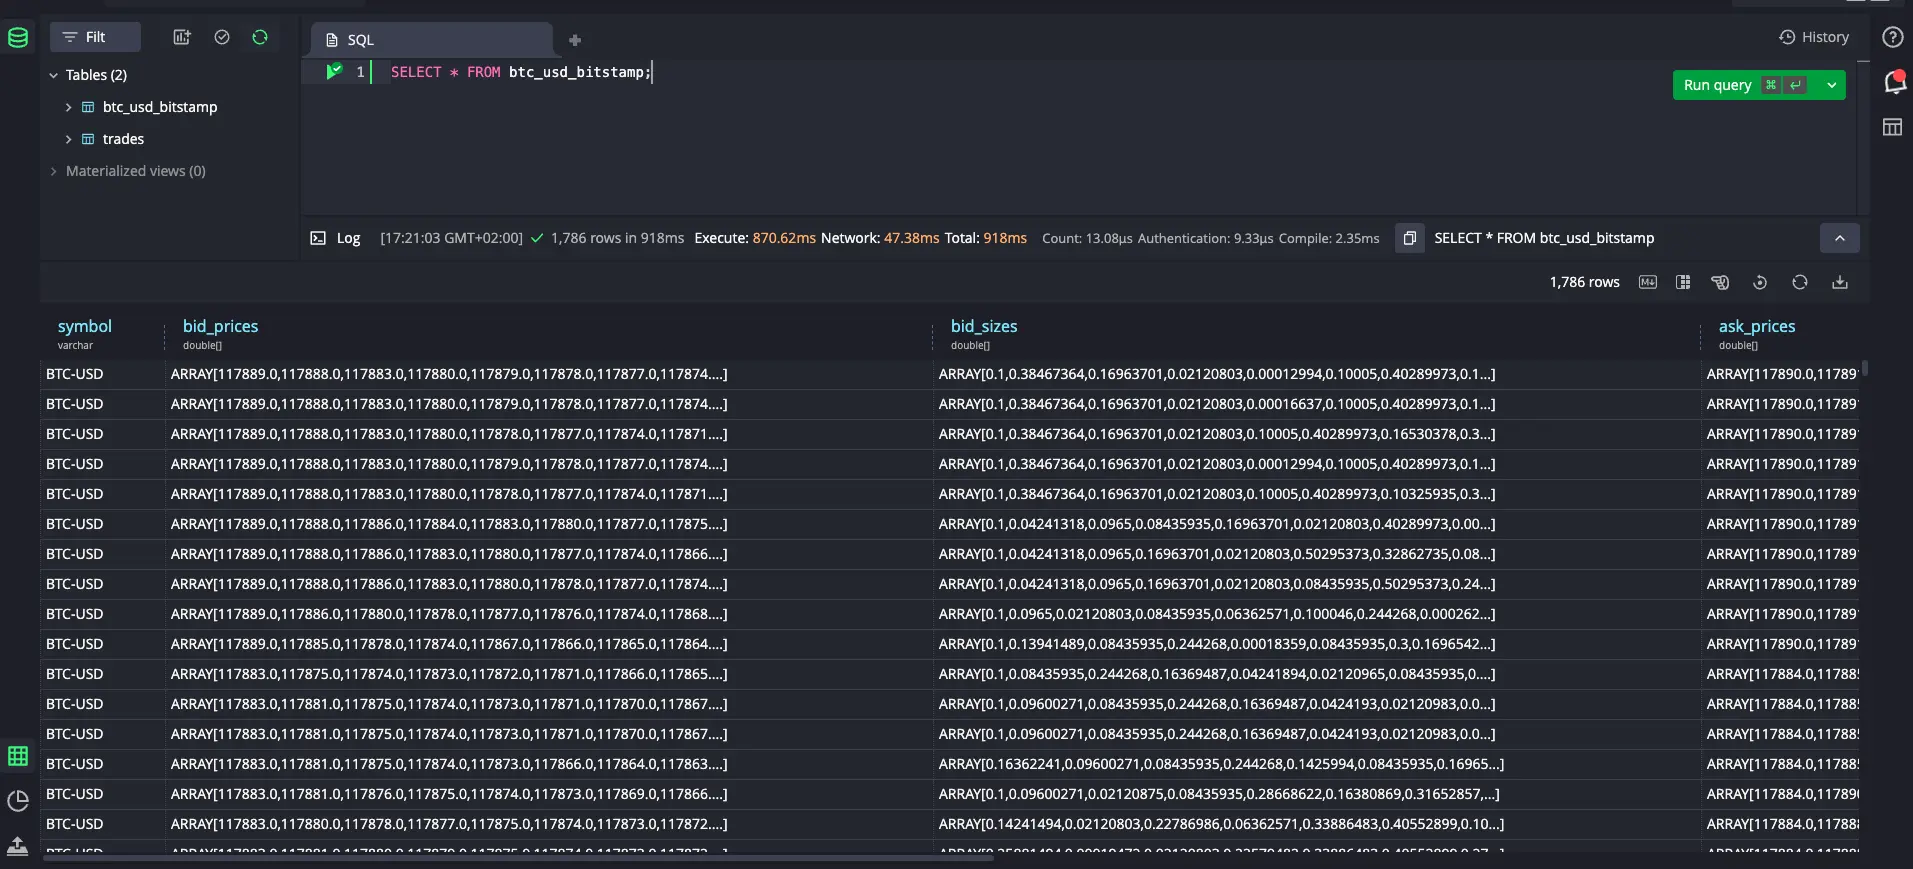
Querying L2 data
Before proceeding, make sure you run the above ingestion script:
python ingest.py
Next, we will query the database and view our data.
Querying L2 data
We can perform a quick sanity check and see what was written:
SELECT * FROM btc_usd_bitstamp;
Now let's run through some example queries:
Selecting the best bids and asks
TIP
When accessing values in an array, QuestDB uses 1-based indexing, following standard SQL conventions.
SELECTtimestamp,bid_prices[1] AS best_bid,ask_prices[1] AS best_askFROM btc_usd_bitstampORDER BY timestamp DESCLIMIT 10;
| timestamp | best_bid | best_ask |
|---|---|---|
| 2025-07-31T15:12:36.504695Z | 118027.0 | 118028.0 |
| 2025-07-31T15:12:36.188858Z | 118026.0 | 118028.0 |
| 2025-07-31T15:12:35.878437Z | 118021.0 | 118024.0 |
| 2025-07-31T15:12:35.555968Z | 118022.0 | 118024.0 |
| 2025-07-31T15:12:35.247727Z | 118020.0 | 118022.0 |
| 2025-07-31T15:12:34.920907Z | 118021.0 | 118022.0 |
| 2025-07-31T15:12:34.606257Z | 118021.0 | 118022.0 |
| 2025-07-31T15:12:34.285651Z | 118021.0 | 118022.0 |
| 2025-07-31T15:12:33.969207Z | 118021.0 | 118022.0 |
| 2025-07-31T15:12:33.665459Z | 118021.0 | 118022.0 |
Selecting the average of the best bids and asks over 30 second intervals
SELECTavg(bid_prices[1]) as avg_best_bid,avg(ask_prices[1]) as avg_best_askFROM btc_usd_bitstampSAMPLE BY 30s;
| avg_best_bid | avg_best_ask |
|---|---|
| 117885.88421052632 | 117887.02105263158 |
| 118001.17021276595 | 118005.25531914894 |
| 118039.58947368422 | 118041.05263157895 |
| 118037.41935483871 | 118038.64516129032 |
| 118077.14814814815 | 118079.46296296296 |
Calculating the latest spread
The spread represents the difference between the price you'd pay to buy a specific volume (using ask prices) and the price you'd receive to sell the same volume (using bid prices). This is a key measure of market liquidity and trading costs.
Here we calculate the spread for a volume of 18 BTC by using QuestDB's
l2price() function, which computes the average execution price across multiple
order book levels to fill the target volume:
DECLARE@volume := 18,@asks := l2price(@volume, ask_sizes, ask_prices),@bids := l2price(@volume, bid_sizes, bid_prices),@spread := spread(@bids, @asks)SELECT timestamp,@spread as spreadFROM btc_usd_bitstampLIMIT -1;
| timestamp | spread |
|---|---|
| 2025-07-31T15:14:07.092943Z | 189.75827528552327 |
Finding the price level for a given volume
This query uses array_cum_sum to do a cumulative sum of the ask sizes. It then
uses the insertion_point function to find at which position our target volume
would be available. There's a set of
array-specific functions to experiment with.
SELECTtimestamp,array_cum_sum(ask_sizes) cum_volumes,insertion_point(cum_volumes, 18, true) target_levelFROM btc_usd_bitstamplimit -5;
| timestamp | cum_volumes | target_level |
|---|---|---|
| 2025-07-31T15:14:30.890342Z | ARRAY[0.12274851,0.18...] | 49 |
| 2025-07-31T15:14:31.193497Z | ARRAY[0.12274851,0.29...] | 49 |
| 2025-07-31T15:14:31.512645Z | ARRAY[0.12274851,0.17...] | 52 |
| 2025-07-31T15:14:31.833741Z | ARRAY[0.12274851,0.17...] | 51 |
| 2025-07-31T15:14:32.145116Z | ARRAY[0.12188851,0.25...] | 51 |
Alternate order book layouts
So far, we have used several 1D arrays to store our order book data. However, there are alternate data models available.
For example, the questdb demo has a live (simulated)
FX dataset storing bids and asks as bi-dimensional arrays, where bids[1] and
asks[1] represent the prices at multiple levels, while bids[2] and asks[2]
hold the sizes at the same levels.
You can run this query to find the spread in basis points on the demo dataset.
SELECT timestamp, symbol, spread_bps(bids[1][1], asks[1][1]) spread_bpsFROM market_dataWHERE symbol IN ('GBPUSD', 'EURUSD')LIMIT -10;
Wrapping up
In this tutorial, we modified our Cryptofeed example to send L2 book data using arrays.
Instead of using many rows or many columns to represent each (price, size) pair, we can instead use arrays to ingest and query L2 data compactly. This makes it easier to store and later analyze for trends, with lower overall overhead.
We've also shown alternate models for order books, for example as bi-dimensional arrays.